Buggybags
Std Class Seat- Test Pilot Reviews
|
|
|
The
Mk4 Prototype Seat has been supplied to 4 independant Buggiers for opinion
and feedback, improvements have been built into the Final Mk5 Design |
| Test
Pilots |
Kite
Boy Stu, Icarus, Wenglish and Rocky |
| |
Many
thanks to the individuals in the above team that have helped developed
the Std Class Seat, cheers Guys. |
|
|
| Wenglish
|
| From:
s*****@aol.com [mailto:sskeer@aol.com]
Sent: 17 February 2009 20:33
To: kitebuggybagman@buggybags.co.uk
Subject: Re: seat
Standard
buggy seat
Seems
slighly longer / deeper than the original flexi seat, had to adjust
the down tube so I could reach the pegs and still apply full lock.
The
backrest is very comfortable and the height is good offering good support
even when the seat is dropped right down and back.The corners of the
seat don’t dig in the kidneys like it does on the flexi however
there was a slight issue I had with the plastic support in the backrest,
it seemed a bit too big and I trimmed it by 5mm across the bottom and
rounded the corners off and this felt much better and allowed the top
flap to close much better on the Velcro.
-------------------------------------------------------------------------------------------
Buggybags comment: Back rest support not finalised for the Prototype
seat, sizing of the back pad stiffner will be correct for the production
seats.
-------------------------------------------------------------------------------------------
The webbing straps on the back of the seat:
I found I preferred the upper straps as this gave the back of the seat
a more sold feel when I was leaning back into the points for pulling
the seat back I really like the strap that comes o ver the top of the
seat as you can really tighten it up and it pulls the whole seat taught
at the back the lower points attached to the back of the backrest didn’t
give the same feel and especially when dropping the seat right down
didn’t hold the seat as well I think the lower webbing strap that
connects to the side rails and the two connecting points on the back
of the backrest could be removed saving work , materials and costs.
----------------------------------------------------------------------------------------
Buggybags Comment: Extra rings added to the prototype seats only
to allow to test all options to determine correct setting for production
seat.
----------------------------------------------------------------------------------------
The
metal rings give a good connection point for the front splash guard,
not really a design feature but much better than where the splash guard
connects to the flexi seat.
Having
the seat lifted fully up and brought forward gave a really good position
in the buggy, jumping like this felt fine. The padding coming over the
side rails was great and nice to have (I don’t have side rail
pads normally) and it was nice to be able to really lean into them and
not feel any discomfort the fit around the side rails is good . lifting
the seat I went for a run around the common and parts where I normally
grounded the buggy with the flexi seat the extra ground clearance meant
this only happened once or twice. The material on the under side of
the seat doesn’t look any worse for wear after going over nettles,
a thorn bush of sorts and a load of long grass and ferns and other twiggy
small plants. I gather its water resistant however perhaps a second
drain hole or moving the drain hole further back as its quite far forward
on the red seat.
Jumping
the buggy in this position felt good the seat didn’t move about
on landing or feel like it was going to give in any places, the webbing
support under the seat could barely be noticed especially with a harness
on and even without a harness I didn’t notice it. It didn’t
feel like I was sat on webbing or like it was trying to push me into
certain areas of the seat.
On two wheels the whole thing felt solid and gave a good platform to
sit on. On my flexi seat the seat moves quite a bit when you go onto
two wheels and gives you the platform, this seat didn’t but it
didn’t feel like it needed to there was plenty of material there
and the padding that comes over the side rail makes landing on two wheels
nicer when it doesn’t go as smooth as it should.
When you drop the seat back and lower it right down allowing the backrest
to sit at about 45 degrees the buggy instantly feels very solid, I found
I was able to ride with y weight over the back corner of the buggy very
easily and this meant the kite could be kept powered up and put almost
anywhere as balance point was very low and it was quite hard to tip
the buggy like this (I managed it though lol, though ill blame a tuft
of grass that I hit as the buggy was sliding round the turn), you do
lose some of the responsiveness of the buggy like this though and its
not as easy to flick the back end out, a bit of practice should sort
this out but for going round a course I can see this beading my preferred
seating position as you can defiantly hold more power and it feels nicer
going in a straight line (there is very little ground clearance like
this a razor shell wont do much harm with all the webbing and padding
but a sand steak might give you a few stitches, just the same as any
bug with a low seating position.) when ridden like this there is no
padding on the side rails but you don’t notice its missing because
of how far down in the seat your sat. sitting like this is almost like
lying down and with the blue and red seat you don’t notice the
cut outs here.
Ill
get some pictures of me actually riding in the buggy next time I get
out as there wasn’t anyone about to take pictures today.
Oh the red seat would look great on the new flexi buggy. It would set
the white frame off nicely and match the forks.
Stu
Ps
seat is now CAT1 approved.
As I get more time on the seat ill give you more information and feed
back but so far so good, just the above points. |
|
| Rocky's
Review |
-----Original
Message-----
From: ********@blueyonder.co.uk [mailto:******@blueyonder.co.uk]
Sent: 21 February 2009 20:21
To: kitebuggybagman@buggybags.co.uk
Subject: Proto Seat 4 Rockys first impressions
Hi Jon
Well the seat is on the Flexi cambered axle racer ready to take to
Brean First thing in the morning. Very nice it looks to.
The first thing that struck me was that the finishing was mush nicer
than the proto you showed me at the ho, a top quality product.
Well before I could fit the seat I had to take to flexi one off. What
a pa lava. The whole bug was stripped down. I then put the buggy frame
back together and started to fit the seat into the bare frame and
wheels. I tried a few different configurations of straps and come
up with what I think is the best option to start. Its not how you
described it to be in the e-mail. I have had the seat in the high
and low positions and took a load of pics the adjustment could put
the seat on the floor no problem.
There
are a couple things that have jumped out at me so far.
1.When
the seat is lowered the front edge of the seat wants to drop down.
If it does the back end of the down tube is revealed. This is around
the wedding tackle area. I wouldn't want to end up tangled up in that
area in a spill. I just ensured that the tension in that area is maintained
when the seat was lowered and it was better.
-----------------------------------------------------------------------------------------
Buggybags Comment : front straps should be tight, covering the
down tube as per most seats, we have also adjusted the postition of
the front straps as per our Race Class Seat.
------------------------------------------------------------------------------------------
2. The two sets of buckles on the centre back of the seat are not
working for me. I found that when I pulled some tension on them the
rear of the seat pulled the velcro off. The strap over the top of
the seat worked much better. I am thinking they are only for holding
the backrest up is that correct
------------------------------------------------------------------------------------------
Buggybags comment: Centre Tension strap will be on the production
seats making the rear ones redundant
------------------------------------------------------------------------------------------
3. The two side adjustment straps for the seat have been used in the
top eyes and works well giving strong support.
4. I tried
the long strap around the seat and whilst it supports the seat it
allows the side of the seat to move forward when you sit in the seat.
I ran it around the rear axle and wound it around the side rails and
it really beefed up the feel of the seat.
5.So far
I have not cut any excess off the straps but I will. I have tidied
up the loose ends by using cable ties. I have also run the long excess
portion of the rear side rail strap through the spare rings not being
used on the back support.
----------------------------------------------------------------------------------------
Buggybags Comment: Production Seats will have correct length straps,
extra length were added to these ones for prototype purposes only
----------------------------------------------------------------------------------------
|
Kite
Boy Stu's Review |
From:
Stuart McDonald [mailto:*******_mcdonald1@sky.com]
Sent: 23 February 2009 21:09
To: Buggybags
Subject: Re: Std Class Seat Prototype 4
KITEBOYSTU’S REVIEW OF BUGGYBAGMAN’S NEW AND
IMPROVED ALTERNATIVE SEAT FOR THE FLEXIFOIL BUGGY
INTRO
I've been kite buggying for nearly ten years now and have owned several
different buggies over the years.
The buggy of choice for me though is the Flexifoil buggy as I'm now
into 'buggy jumping'.
There are high stresses and loads placed upon a buggy when using large
fixed-power kites: strapped in, holding down loads of power and then
jumping and often landing hard. The frame of the buggy can withstand
most abuse, but I have bent and snapped the odd bit here and there over
the years.
For me, the weakest point on the buggy has always been the seat. The
plastic buckles all broke and I ended up replacing them with metal 'd'
rings just to get by. The stitching also came away in several places
and the webbing frayed in other areas.
When it came time to buy a new Flexifoil buggy I was determined not
to trash the seat of the new one so quickly.
I've ended up cross-bracing the underside of the seat with heavy duty
webbing straps across the frame. These help take the loads of hard landings
and so far have 'saved' the seat from failing...for now.
When I spoke to Jon at buggybags.co.uk about his thoughts on a replacement
seat for the buggy I was excited at his ideas and he soon started work
on a protoype.
Pretty soon it was ready to be tested and Jon popped one in the post
to me to try out...
FIRST IMPRESSIONS
When I unwrapped the seat from it's packaging I was very pleased with
what I saw. Straight away I could see that the build quality was exceptional
and the craftsmanship was of a high standard.
The materials used were very heavy duty and hard wearing and I was impressed
with the additional sewn in under-layer of wipe-clean material. It’s
almost like a built-in splash guard.
The stitching was strong and neat and the webbing straps were of a higher
grade of material than on other seats. The stainless steel double rings
were a really good idea. They're so much stronger than plastic buckles
and will NEVER break - even under the load of jumping.
The seat had padding sewn into it all over and it was wider so that
it came up over the side rails to provide built in padding there. The
back rest is also very sturdy and well padded.
I took the Flexifoil seat off and compared them side by side. The Flexifoil
seat feels lighter in comparison, but that's because it uses thinner
material, webbing straps and plastic buckles. Jon's new seat is a little
heavier, but that's because it is slightly larger (as it covers the
side rails) and will last and is made of much heavier-duty materials
and stainless steel rings.
Once I'd fitted the seat I stood back and was pleased with the 'look'
of it on the frame - really smart and stunning in the electric blue
material Jon had chosen. It really stands out!
TEST TIME
I got set up and lowered myself into the new seat and thought - wow
this is actually really comfy and supportive.
I strapped myself into my captive systems and launched the 8.5 Blade
into the air.
As soon as I took off I knew the seat was great! It felt like I was
actually sitting IN the buggy instead of ON it (which is a common complaint
about the original Flexifoil seat - some people prefer to fit Peter
Lynn XR seats to them).
I popped straight up onto two wheels and leant right over as I sped
across the field at a fair old lick! I felt confident, comfortable,
supported and safe. I just grinned from ear to ear for the whole session!
I immediately sent the kite over for a jump and went skyward. Again,
everything felt strong and supportive in the air. I came down fast and
a little hard - not one of my best landings. But immediately I thought,
WOW that didn't hurt. That's a new experience for me. The seat was very
forgiving and definitely soften the blow of a 'hot' landing. I was again
IMPRESSED!
The original Flexifoil seat feels so much less forgiving, being stiffer
and more taught across the frame. As a result, when you land hard you
feel it! You get a jolt right up your spine - which is not good. This
does not happen with Jon's new seat at all.
I cruised around for a good four hours - fully powered on the 8.5 Blade
III. I soon realised I could hold down more power than before as the
seat sat just that little bit lower than the original. The wind was
much stronger than what I'd normally fly this size in. My boarding friends
commented on the fact that they thought I was doing well with such a
big kite in the strong, gusty conditions we had. You can also lower
the seat even further for that real laid-back beach cruising style.
I performed all my usual flat-land tricks with ease and could move and
turn freely within the new saddle. Aerial antics were also on the menu
for the day. I just felt so much safer and supported that I had the
extra confidence to really go for it and try bigger jumps.
I just kept wishing I'd had a seat like this a few years ago. Perhaps
my back would be in better condition today if I had.
I did have to tighten up the straps on the back rest after about two
hours of constant thrashing, but that's not surprising. And in a way,
I'd rather that the straps gradually loosened than snapped or frayed
under the loads I was imposing on them. I probably need to tighten them
up before each session and they'll be fine. This to me is a good thing.
If something's designed to give then it will last longer than something
that's fixed, taught and under load. So top marks again on the straps
and fixings.
I think there are probably a few too many rings on the back of the seat.
We could probably do away with at least two if not even three of the
rings there. I think the strap from the front of the seat that goes
over and behind and round the axle is enough, combined with maybe one
more coming from the base of the seat. But I suppose the more the merrier.
You don't have to use them all and they may offer a different ride height
if tinkered with, but I didn't think it needed all of them from a strength
point of view myself.
I didn't find the need to fit either the home-made cross-bracing or
the belly pan I usually use. The amazing cross-bracing sewn underneath
the seat was doing a wonderful job of load-spreading and extending the
lifetime of the seat all on its own. No need for extra straps underneath.
The belly pan is also redundant now as the built-in wipe-clean underlay
keeps you dry. Any hard or sharp objects would also struggle to get
through to your precious behind (unless you buggy over steel spikes
regularly).
CONCLUSION
Overall I'm very very impressed with the seat and would recommend it
as an upgrade to anyone using a Flexifoil buggy – whether you're
a freestyler, cruiser or jumper like myself. It suits all styles and
creates BIG SMILES.
So all I can say is, well done Jon for creating a superior product.
You really are a talented individual. To everyone else; get on the blower
and order yourself one now - in whatever colour takes your fancy - and
stand out from the crowd!
KiteBoyStu
===========================================
DISCLAIMER
The seat is NOT endorsed for use to jump the buggy, or for the buggy
to leave the ground at any time. Using a Kite Buggy for Airborne Sports
is
Dangerous and WILL result in injury to you, others or actual damage
to YOUR buggy/seat. Buggybags cannot accept any liability for use of
your equipment in this way
===========================================
|
Icarus Review
I have been lucky
enough to test this new seat from Buggybags to replace my Flexi seat.
I have had a few seats break on me over the years and this has solved
the problems for me. First thing is that you will not snap the buckles
on this seat!!
Second thing that stands out for me is that you can change the ride
height and move it forward or back this will help the shorter rider
and also it changes the centre of gravity makes a hell of a difference
when free styling with a buggy helps to get the balance right. The
side rail padding when seat is in the higher position is a nice touch
When riding with this seat comfort is one nice thing and it is that
for sure. The side rail padding when seat is in the higher position
is a nice touch. Once getting the buggy airborne the hole thing seems
closer to me --part of me if that makes sense feels like I can ass
tweak the jump more than the old seat as I am one of the slimmer riders
out there this is a good thing, there was too much room in the back
of the flexi seat for me being able to move the new seat forward means
I am closer to my lap belt with less space behind me!! hope this all
makes sense. Over all this seat seems to tick all the right boxes
for me nothing bad to say quite a few people have seen this buggy
seat most off the comments are good had one about poor finish but
I said its a Proto dumb ass!
Icarus
|
| |
|
|
|
|
|
|
|
| Stainless
Metalwork |
|
|
| Avoid
Slippage of the buckles by double looping them back on themselves |
|
ADJUSTABLE
BACK REST
A
great addition to the seat, which also makes it much easier to mount
on the buggy.
|
|
Good
Quality Cordura used (same as the bags) to cover the foam, quilted pattern
can be seen |
| |
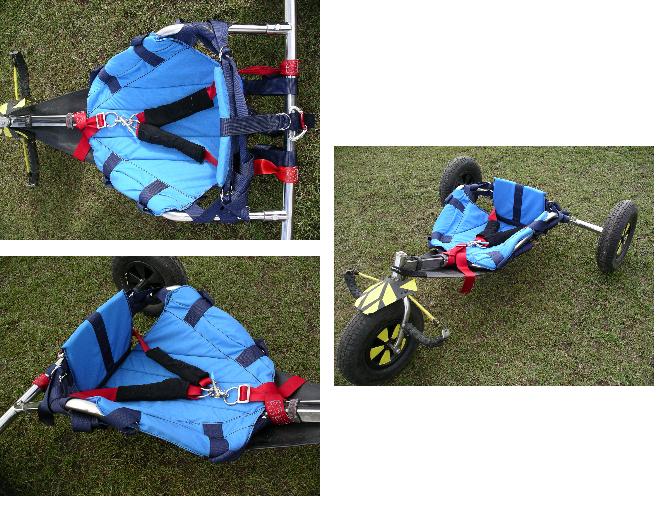
Many thanks to
Rocky for these pictures of the 1st Green Seat fitted to his
Flexifoil 2002
Wide Axle Kite Buggy
|
|
|
You
can clearly see how low the seat can be lowered allow much more power
to be held |
|
|
|
|
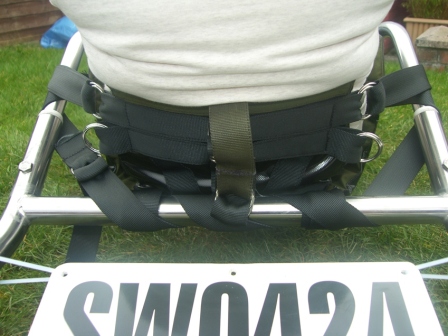
We
have built in our under slung harness to distribute pilot weight over
the entire seat, note that the axle straps reach the cross webbing for
extra strength |
|
|
Cross member straps join to the side rail attachment points to even
the load
|
|
Specifications
Stainless Steel Rings
Wide
Heavy Duty Webbing
Stainless
Steel Grommet(Drainage Hole)
Made
from Heavy Weight Fabrics
Metric
12 Heavy Duty Thread for all areas
Unique
Integral support that spreads the load over the whole seat
12mm
Extra Thick High Density Water repelent Foam
Inner
seat Pad Cordura
|
Note: Design can
be modified at any time
DISCLAIMER
The seat is
NOT endorsed for use to jump the buggy, or for the buggy to leave
the ground at any time.
Using a Kite
Buggy for Airborne Sports is
Dangerous
and
WILL
result
in injury to
you,
others or actual damage to YOUR buggy/seat.
Buggybags
cannot accept any liability for use of your equipment in this way
|
|
|
.JPG)

.JPG)
.JPG)
.JPG)
.JPG)
.JPG)
.JPG)
.jpg)